Tab Badge |
  
|
Tab Badge |
|

In this tab you can define the badge number by which the employee can identify himself towards the badge reader. The badge number is an input field of the type "Table input field". So you can define multiple badge numbers to 1 employee. This to keep a history of the badges which the employee has received, or to give more than 1 badge to an employee.
These fields form together the entire badge number. In case you use EM4102 or Mifare serial number badges, you only need to fill out the badge number. In case of the Mifare sector the 3 fields can be used, so that for example when one loses the badge the same number with a higher version number can be used. Unused fields must be set at "0".
The validity period of the badge. Out of this period the badge will be invalid.
With this field you can set the full definition of the badge to valid or invalid. This allows you to change a row very quickly into invalid (for example when you lose it).
You can change your employee badge number by clicking on the icon 'Edit row'.

The entry fields are then visible and you can make an adjustment in every field.

Then finally, after entering your adjustments, press the ![]() button on top of your screen. The changed badge number is now saved.
button on top of your screen. The changed badge number is now saved.
You can remove an existing badge number by clicking on the delete icon at the end of the row.

Next you click on the button ![]() on top of the screen. Then the badge number is removed. This badge number may finally be assigned again to an employee of your choice.
on top of the screen. Then the badge number is removed. This badge number may finally be assigned again to an employee of your choice.
When you want to keep a history of your badge numbers, for example when you want to know what badge number has been used in the past by the employee, you can apply it in this way to the employee under the tab badge.
First click on the icon 'Edit row'.
Then, uncheck the validity of the badge number.

Finally, you click on the button ![]() on top of the screen.
on top of the screen.
The badge number is now inactive for the employee and may eventually be assigned to another employee. The data regarding the deactivated badge number will stay mentioned here with the employee. You can also reactivate this badge number by checking the validity again, if the badge number is not already assigned to another employee.


The entry fields are then visible, you can enter the necessary data field of the new badge in each field, such as the number of the badge, the company code which is applicable in case you work with a keypad code, a PIN, etc.

Next, after entering your data, you click on the button ![]() on top of your screen. Then finally the new badge number is saved.
on top of your screen. Then finally the new badge number is saved.
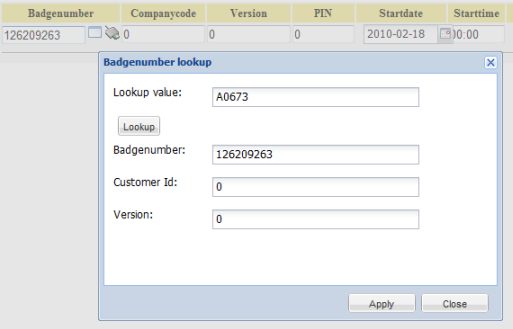
In case you have a "badge lookup table" available, you can also enter the required fields behind the badge number with the icon ![]() via the popup of the lookup table (the lookup table is usually a link between a simple number on the badge, and the long effective internal badge number).
via the popup of the lookup table (the lookup table is usually a link between a simple number on the badge, and the long effective internal badge number).
In case you have a registration reader available to read badges, you can automatically fill out the fields by clicking on the icon ![]() behind the badge number and by presenting the badge. This avoids typing mistakes and the necessity to enter a number on the badge. For this functionality you need to have a desktop registration reader available and you need to install the program SynReg.
behind the badge number and by presenting the badge. This avoids typing mistakes and the necessity to enter a number on the badge. For this functionality you need to have a desktop registration reader available and you need to install the program SynReg.