Access profiles editor |
  
|
Access profiles editor |
|
In the access profiles editor you immediately have an overview for the selected profile of the already defined accesses on barriers (doors, barriers to enter, etc.) and on zones. Hereby barriers are always shown with the zone which make a zone transition. Barriers which are not assigned to a zone are shown separately.
Barriers and zones form a group of readers which allow access in practice, whether or not in a certain direction:
•Barriers: all the readers at this barrier are defined.
•Zones: all the readers which are defined at barriers and which allow access to this zone.
![]()
![]()
Default, only the zones and barriers are shown which have already been defined in this access profile. In case you click on ![]() all zones and barriers are shown, also the once on which no access is defined. If you want to define more access on certain zones and/or barriers then you have to click on this button to select the required zone/barrier, on which you want to assign an additional definition.
all zones and barriers are shown, also the once on which no access is defined. If you want to define more access on certain zones and/or barriers then you have to click on this button to select the required zone/barrier, on which you want to assign an additional definition.
Default only the zones and barriers (which are not linked to a zone) are shown. Normally you will also define access rights on that level. You can visualize the accesses and associated readers for each zone/barrier by clicking on ![]() . This will list all the underlying accesses and readers for all the items in the list. You can also visualize this for only 1 zone/barrier by clicking on the icon
. This will list all the underlying accesses and readers for all the items in the list. You can also visualize this for only 1 zone/barrier by clicking on the icon ![]() in the list. Only that zone/barrier will then be expand. This functionality is useful to show an overview of what actual accesses/readers it's about and eventually still define an abnormal functionality on a certain specific access.
in the list. Only that zone/barrier will then be expand. This functionality is useful to show an overview of what actual accesses/readers it's about and eventually still define an abnormal functionality on a certain specific access.
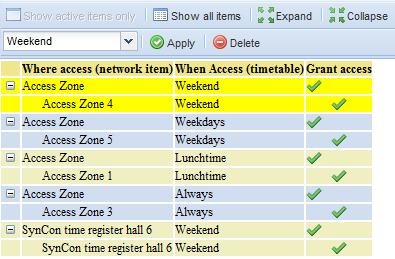
You can very easily add and/or change access rights to a zone barrier by selecting the row on which you want to allow/change access. You select a row by simply clicking on it, which then lights up yellow (see figure above, you can also select multiple rows at once by holding the <ctrl> key or the <shift> and by clicking on several rows). On the second line in the editor the name of the selected zone/barrier appears and you can then enter a time schedule. By clicking on the "Apply" icon you set the access rights on the selected zone/barrier (where), according to the given timetable (when):
![]()
You can delete again already entered access rights (timetable on a zone/barrier) by clicking on the "delete" icon ![]() in the required row .
in the required row .